







 0
0
 0
0
Read Time:7 Minute, 35 Second
Let’s be honest—when you live in a cramped apartment or a condo with a postage-stamp balcony, the idea of composting feels like a luxury reserved for people with sprawling yards. You picture a steaming pile of leaves, a pitchfork, and maybe a neighbor’s dog wandering over to investigate. But here’s the deal: you don’t need a backyard to turn your banana peels and coffee grounds into black gold. In fact, two methods—worm bins and bokashi—are practically built for small spaces. They’re quiet, compact, and, honestly, kind of fascinating once you get the hang of them.
I’ve been there. My first apartment had a kitchen the size of a closet, and I still managed to compost. The trick? Choosing the right system for your lifestyle, your tolerance for “living things,” and your willingness to get your hands a little dirty. So, let’s break down both options, warts and all. You might be surprised at which one fits your life better.
Why Bother Composting in the First Place?
Before we dive into the nitty-gritty, it’s worth asking: why go through the hassle? Well, food waste in landfills is a massive problem. When organic matter breaks down without oxygen—which happens in those giant trash heaps—it releases methane, a greenhouse gas that’s roughly 25 times more potent than carbon dioxide over a 100-year period. That’s not just a statistic; that’s a gut punch to the planet.
But here’s the flip side. When you compost at home, you’re not just reducing methane. You’re creating something useful. That crumbly, earthy material can feed your houseplants, revive a sad balcony herb garden, or even be gifted to a friend with a yard (trust me, they’ll love you for it). Plus, there’s a quiet satisfaction in watching waste transform into life. It’s alchemy, but with carrot peels.
Worm Bins: The Living, Breathing Compost Factory
Worm bins, also known as vermicomposting, are exactly what they sound like—you keep a colony of red wiggler worms (not your garden variety earthworms) in a bin, feed them your scraps, and they poop out castings. And worm castings? They’re like a superfood for plants. Rich in nitrogen, phosphorus, and potassium, plus a host of micronutrients that synthetic fertilizers just can’t replicate.
Now, I know what you’re thinking. Worms? In my kitchen? It sounds gross, but honestly, it’s not. A well-maintained worm bin is virtually odorless. The worms themselves are dry, wriggly, and kind of… cute? Okay, maybe not cute, but definitely fascinating. They’re quiet, they don’t escape (if you keep the bin moist but not soggy), and they work 24/7 without complaining.
Setting Up Your First Worm Bin
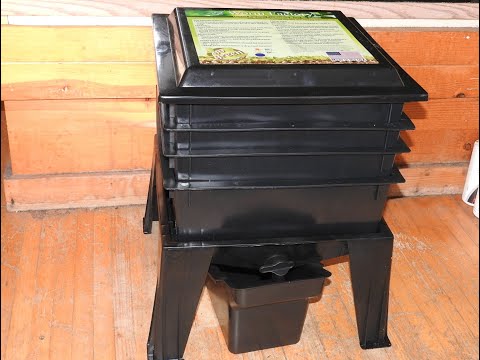
You can buy a ready-made worm bin online—they usually come in a stackable tray design that makes harvesting easy. But if you’re on a budget, a simple plastic tote with a lid works just fine. Drill a few holes in the top for airflow, add a layer of shredded newspaper or cardboard as bedding, moisten it so it feels like a wrung-out sponge, and then introduce your worms. A good starting population is about 1 pound of worms (roughly 1,000 individuals) for every half-pound of food scraps you produce daily.
Here’s the key: worms don’t eat food directly. They eat the microorganisms that break down the food. So, you’re not just feeding them; you’re cultivating a tiny ecosystem. Bury the scraps under the bedding to avoid fruit flies, and give them time. In about 2-3 months, you’ll notice the bedding turning dark and crumbly—that’s your harvest.
What Can (and Can’t) Go in a Worm Bin
Worms are picky, but not impossibly so. They love:
- Fruit and vegetable scraps (chopped into smaller pieces helps)
- Coffee grounds and filters
- Tea bags (remove the staple, if any)
- Crushed eggshells (they provide grit for digestion)
- Shredded paper and cardboard
They absolutely hate:
- Citrus and onions (too acidic)
- Dairy, meat, and oily foods (they’ll rot and smell)
- Spicy stuff like chili peppers
- Processed foods with preservatives
The learning curve is real. I once dumped a whole grapefruit in there and the worms went on strike. They didn’t die, but they did cluster at the top, which is their way of saying, “What the heck, human?” So, start slow. Observation is your best tool.
Bokashi: The Fermentation Powerhouse
If worms give you the heebie-jeebies, or if you want to compost everything—including meat, dairy, and cooked food—bokashi is your answer. Bokashi is a Japanese method that relies on anaerobic fermentation. You use a special bran inoculated with effective microorganisms (EM) to pickle your food waste in a sealed bucket.
The process is almost too easy. You get a bokashi bucket with a tight-fitting lid and a spigot at the bottom. Add your food scraps, sprinkle a layer of bran, press down to remove air, and seal it. Repeat until the bucket is full. Then, let it sit for two weeks. During that time, the microorganisms are hard at work, lacto-fermenting the waste. It smells like… well, like pickles or sourdough, not garbage. That’s a win.
The “Pre-Compost” Step
Here’s the catch—and it’s a big one. Bokashi doesn’t actually produce finished compost. It produces a fermented pre-compost that’s too acidic for plants to handle directly. You have to bury it in soil (even a large planter works) and let it break down further for a few weeks. If you don’t have any soil, this becomes a logistical headache. But if you’ve got a balcony with pots, or a community garden plot, you’re golden.
That said, the benefits are undeniable. You can compost anything—bones, cheese, cooked pasta, that sad leftover stir-fry from Tuesday. Nothing goes to waste. Plus, the liquid that drains from the bucket (called “bokashi tea”) is a fantastic liquid fertilizer when diluted with water. It’s like getting two products from one bucket.
Worm Bins vs. Bokashi: A Side-by-Side Showdown
So, which one should you choose? Well, that depends on your personality, your space, and your tolerance for maintenance. Let’s break it down in a table, because who doesn’t love a good comparison?
| Feature | Worm Bin | Bokashi |
|---|---|---|
| Space needed | Medium (a 10-15 gallon bin) | Small (a 5-gallon bucket) |
| Odor | Earthy, mild (if done right) | Pickle-like, fermented |
| What you can compost | Fruits, veggies, coffee, paper | Everything, including meat & dairy |
| Maintenance | Weekly feeding, moisture checks | Add scraps, drain liquid, wait |
| Time to finished product | 2-3 months | 4-6 weeks (plus burial time) |
| Living creatures | Yes (worms) | No (microorganisms only) |
| Cost to start | $50-$100 | $40-$70 |
| Best for | Plant lovers, patient folks | Busy people, meat eaters |
See the trade-offs? Worms give you a continuous supply of finished compost, but they’re delicate. They can die if the bin gets too hot, too cold, or too wet. Bokashi, on the other hand, is nearly foolproof. It’s a set-and-forget system that handles almost anything, but it requires a secondary step to finish the job.
Can You Combine Both? (Yes, and It’s Brilliant)
Here’s a pro move that not many people talk about: use bokashi as a pre-treatment for your worm bin. Ferment your scraps in the bokashi bucket first, then feed the fermented waste to your worms. The worms go crazy for it—it’s already partially broken down, so they can process it faster. Plus, the acidity neutralizes during fermentation, so you can feed them citrus and onions without issue.
This hybrid approach gives you the best of both worlds. You get the convenience of bokashi (compost everything) and the output of vermicomposting (rich castings). It’s a bit more work, sure, but if you’re serious about zero waste, it’s a game-changer.
Troubleshooting Common Pitfalls
No system is perfect, and you’ll hit snags. Here are the most common issues and how to fix them.
Fruit Flies in Your Worm Bin
This is the #1 complaint. The fix? Always bury your scraps completely under the bedding. If they still appear, freeze your scraps for 24 hours before adding them—this kills any eggs. Also, cover the bin with a layer of dry newspaper on top. It acts as a barrier.
Bokashi Smells Like Rotten Eggs
That’s a sign of putrefaction, not fermentation. Usually means you added too much waste at once, or the lid wasn’t sealed tight. Drain the liquid, add more bran, and press down firmly. If it still stinks, you might need to start over—but don’t toss the contents; bury them in soil anyway, they’ll break down.
Worms Are Escaping
Worms don’t usually flee unless conditions are bad. Check for excess moisture, lack of food, or temperature extremes. Also, make sure the bin isn’t exposed to bright light—worms are photophobic. A dark corner is their happy place.
What About Odor and P

 Happy
0 %
Happy
0 %
 Sad
0 %
Sad
0 %
 Excited
0 %
Excited
0 %
 Sleepy
0 %
Sleepy
0 %
 Angry
0 %
Angry
0 %
 Surprise
0 %
Surprise
0 %
Happy
0 %
Sad
0 %
Excited
0 %
Sleepy
0 %
Angry
0 %
Surprise
0 %